Buy the Anbernic RG40XX H here: https://joeysrh.link/ANB_RG40XXH
Recommended Accessories
- SanDisk 64GB – For the first SD card slot.
- Samsung 128GB – For the second SD card slot.
- UGREEN SD Card Reader – Great SD Card reader option.
- UGREEN Mini HDMI to HDMI – for HDMI out.
How to add games on Stock firmware
There’s two different ways to add games to your Anbernic RG40XX H. It all depends on if you’re using one SD card or two SD cards.
If you have a single SD card, with the handheld off, eject it from the TF1 slot on the bottom of your device and insert it into your PC using an SD card reader.
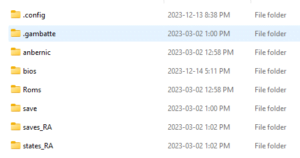
You’ll likely see a folder structure that looks similar to this on the SD card.

It might be self explanatory now, but if you go inside of the Roms folder, you will see subfolders for a bunch of different game systems. If you go inside of a folder, for example GBA, you will see the Game Boy Advance games that the device shipped with.

So it’s pretty simple, add any new Game Boy Advance games to this specific folder. When you turn on the device next time, you’ll see your new games.
Two Card Setup
Now, if you have two SD cards, or let’s say you want to add a second larger SD card, here’s the steps.
First, with the handheld off, insert the second SD card into the TF2 slot and turn on your device.
Then, turn off the device and eject the SD card from the TF2 slot on the bottom of your device and insert it into your PC using an SD card reader.
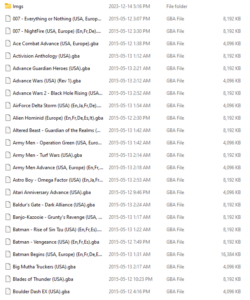
You should see a folder structure that looks like this on the SD card.

If you go inside of the Roms folder, you will see subfolders for a bunch of different game systems. If you go inside of a folder, for example GBA, you will see the Game Boy Advance games that the device shipped with.
Now, if you want to move your games from the first SD card that you had, to this new SD card, you can insert your first SD card, backup your Roms folder to your desktop, and then delete it from that first SD card, then insert the second SD card and overwrite the Roms folder.
You’ll now have your ROMs on your second SD card and you’re all set.
Adding Box Art
Some of you might want boxart, which there’s no way to do on the device, so we’ll have to do it with the PC and I’m going to move quickly through that pretty quickly.
Connect your ROM SD card to your PC and head to Screenscraper.fr and make an account.
Click Skraper at the top right and then Download at the top. Download for your OS.
Extract the 7z file using 7-Zip. Open SkraperUI.exe and login with your Screenscraper credentials that you just created. Click Validate then next.
Let it download resources, it’ll take a very long time.
Click Generic Emulation and next.
Now it wants to know where your Roms are, so click the folder and navigate to your SD card, and the Roms folder. You should see it shows all of the systems here, click next.
Next again.
If you look on the left, that is all of the system folders it found, regardless of whether there’s Roms inside or not. It’s possible it missed a few, so if that’s the case, click the Plus icon, find the system it missed, click the system icon then click okay. Now you have to point it to where that system is so change the Games/Roms folder to the right folder for that system on the SD card. Do this for any missing systems.
Head to the left, click All Systems, go to Game list and change to no backup, just update existing. Head to Media, and you can choose what you want scraped. I don’t need the manual, so going to remove that using the minus button on the left. For media type, internal mix, you can choose what you want. I’m just going to leave it on 4 images.
Now for output folder, remove media and images and change it to Imgs. It should read: %ROMROOTFOLDER%\Imgs\
Once set, click the play button bottom right. Then click OK and it’s going to run. This is going to take a very long time, a very very long time. I would suggest doing one system at a time, by clicking the system on the left then clicking play, but it doesn’t really matter, you can just click the X to stop it and then play again later and it’ll skip already scraped games. In either event, once it’s done scraping, and you put your SD card back in, you’ll have images for your Roms that you can see on the device.
Where are my saves on Stock firmware?
Standalone saves by default are located in the /save/Roms/xxx (xxx being the system name) folder.
RetroArch saves by default are located in the /saves_RA/Roms/xxx (xxx being the system name) folder.
RetroArch states by default are located in the /states_RA/Roms/xxx (xxx being the system name) folder.
If using a two card setup, these folders would be on the second card.
How to update Stock firmware
Note: Anbernic has removed the 64GB firmware from their website, so the below is flashing a 16GB firmware onto your SD card. I would suggest using a 16GB or 32GB SD card in this case, as you cannot add ROMs to this. You will need a second SD card to use ROMs with.
- Back up your save files and any other files you want to keep (Roms, save, saves, states folders – or all the folders, if that’s easier)
- Head to the Anbernic website’s firmware download page located here.
- Find the device model and select Download now.
- Copy the latest version’s download link into your browser and download the firmware.
- Extract the zip file and then head inside the folder it creates.
- Head inside the 16GB folder, and you may see a .7z file or .zip file. Extract it (for .7z, you need 7-zip). You should now see a .img file.
- Connect your SD card to your PC. Use Rufus, included in that folder, to image either your current card (overwriting everything) or a brand new SD card with this .img file. Open Rufus, select on the right, find the .img file and then click start.
- Insert the card into your device, and you’re up to date.
- If you insert a second FAT32 formatted SD card into the second slot, it will populate with folders that you can add your ROMs and saves back to.
HEY Joey..
O just recently bought a RG40XXV but it came with no nintendo games on the TF card.
Os there a place or store I can drop my console to add these games. I don’t have access to a pC or laptop.
Hi Joey, great tutorial, thanks. I have done everything as mentioned for my rg40xx to get the Roms on my second card.
It used to register/read the second card but now doesn’t even see it when I boot it up.
Any thoughts on what I need to do?
Olá, comprei recentemente um aparelho da Anbernic Modelo RG40XX=H, gostaria de saber se tem como realmente jogar com ele Online???
there is only a 16gb file, there isnt any 32gb as the one mentioned in the guide
im seriously thinking of sending it back. and it is only software issue. ive tried 3 different firmwares. stock os dont let me have new cores, mu os dont let me connect to wifi and on knulli you have to have 2 engineering degrees to actually modify anything.
how do i get new cores to show up among the ones that it got shipped with?
i have an rg40xxv that came with ps1, psp and a ton of arcade and sega roms. all nicely showing on the main screen. i can add psp and ps roms and they show up. but i cant make gba, nes, snes etc roms and cores show up on the main screen. any idea please?
also retroarch seems to have a ton of cores installed. i cant remove them. also why dont nes core show up once i put nes roms into nes folder? this is on the shipped firmware.
i have the updated firmware on a separate sd card. it made the roms partition too small and it left 100gb unpartitioned. partitioning it in windows doesnt help. i hate linux so much. you have to be a scientist and know a ton of commands just to do basic stuff
Para estirar la partición usa: “Diskgenius” en windows.
RG40XXV 64 bios not aveilable on Ambernic webpage. Where we can get the link?
you email them. their email is in their contacts page. its a bot so itll answer in like a min or two