ROMs & BIOS
Alright, now before we actually start the setup, you’re going to need PlayStation 3 games, of course.
I would suggest simply creating a ROMs folder on your PC somewhere and then creating a ps3 folder inside of it, as that’s where we’re going to put our PS3 games.

As far as finding the games yourself, you typically want to grab the ISO Decrypted versions and usually the USA region in the filename.
The games will usually download a zip file, make sure to extract them to get the ISO inside.
Now, we actually need the folders that are inside the ISO – so right click the ISO and choose Mount.

Open to the popup and you should see the files and folders like on my screen, but if not check the side to see DVD drive and open that.
Copy everything you see in here, and then head to your ps3 folder that we created earlier, create a folder for the game and then paste the files inside.

Repeat this for any ISO’s you have.
PS3 Firmware
We also need to download the firmware for the PS3, which you can get right off the Playstation website, scroll down to update using a computer, and click Download PS3 Update.

It might give you an error, just click Allow download so it can download.
Installation
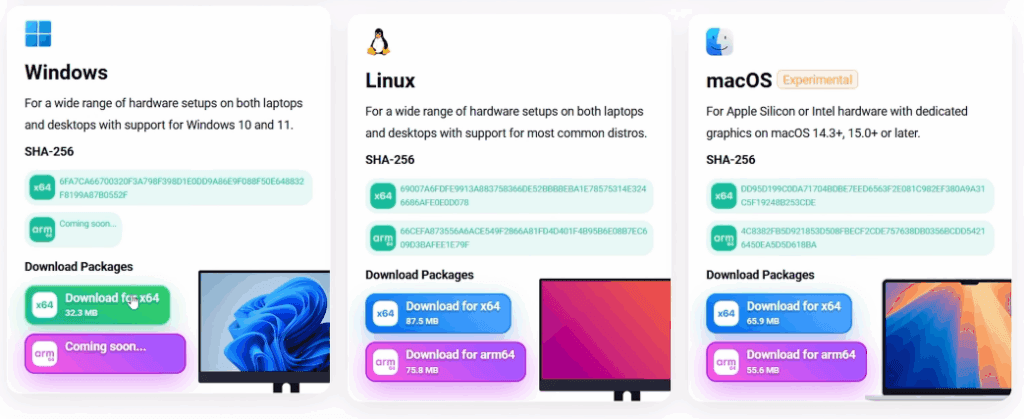
Alright, let’s head over to the rpcs3.net website and click the Download button.
On this page, you’ll want to click the Download for the operating system you have, and since I’m using Windows I’ll click Download for x64.

It’s going to download a 7zipped file, go ahead and right click it and choose Extract All.

At this point, you can move that extracted folder anywhere you want – maybe you have an Emulators folder somewhere on your drive, it doesn’t matter, up to you.
Head inside and we want to open the rpcs3 file to launch the emulator.
Setting up RPCS3
First things first, feel free to create a desktop shortcut or start menu shortcut if you want, I want to use Dark theme for my eyes and then uncheck Show at startup so this doesn’t always popup and then check that you read the Quickstart guide.

You didn’t, but that’s why this post exists.
Click continue.
Installing the PS3 Firmware
We are now in the emulator and the first thing we need to do is install the PS3 system firmware so head to File at the top left, Install Firmware and navigate to that PS3UPDAT.PUP file that we downloaded earlier and select it.

It’ll install and then you can click OK.
A new screen will popup to do some installations and compiling, let it finish.
Adding PS3 Games
It’s now time to tell RPCS3 where our PS3 games are, so click File at the top left, then Add Games and navigate to your ps3 roms folder where your games are and select it.

You should see all your games start to populate and show up.
Now, you’re going to get a screen like this and this is sort of important – there’s an option here for Precompile Caches.

Basically, if you select this now and then click OK, it’s going to compile all the cache for all the games you installed, which could take a long time if you do it all in one shot right now.
Alternatively, whenever you open a game for the first time, it’ll compile those caches at that point.
So it’s up to you, in most cases though, you can keep it unchecked.
Settings
Alright, time to change some settings, head to Configuration at the top then GPU.
GPU
First, for Renderer, Vulkan is usually the default, but you can change this if you see better performance with a different option – I’d suggest leaving it as Vulkan and doing a per-game change that we’ll talk about later.

For Resolution and Scale, I wouldn’t touch these either – you technically can upscale if you’d like, and feel free to try, but I’ve found it to cause problems sometimes.

One change I would make is for Framelimit, to set it to PS3 Native.

Some games will play at 2x speed out of the box making you scratch your head, but PS3 Native solves it.
Now, if you ever do 60FPS patches or anything, you’ll want to change this on a per-game basis and we’ll look at that soon.
Then for Graphics Device, just make sure it’s your dedicated graphics card if you have one and not your internal graphics card.

Lastly, Vsync is an option if you’re noticing tearing in any of your games.

Emulator
Head to the Emulator tab and there’s one change here, Start games in fullscreen mode which is exactly what it says, it starts your games in fullscreen.

You can choose to Enable the Performance Overlay here if you’d like and want to see how games are performing.
GUI
Then head to the GUI tab and only one change, let’s uncheck the Show Exit Game Dialog option.

Basically, whenever you exit a game, this will popup saying are you sure? And that’s annoying, so let’s turn that off.
Click Save at the bottom.
Pads
Let’s do controller stuff now so head to Configuration at the top and then Pads.
By default, it wants to use the Keyboard so choose that dropdown and this all depends on whatever controller you have connected, I’m using an Xbox Controller and that’s XInput.

An easy way to tell if that’s correct is to scroll down after choosing it, and move your sticks – if you see it moving on screen, it’s right.

If you want to remap anything, you can by selecting the mapping and pushing the button on your controller.
Otherwise, go ahead and click Save.
Shortcuts
If you head back to Configuration and then Shortcuts, you’ll see the different hotkeys available to you.

Unfortunately, none of them apply to controllers, so you can’t really do much using the controller for exiting a game, or anything you see here.
To exit a game, I usually just push the Escape button and the X button to get out.
Game Patches
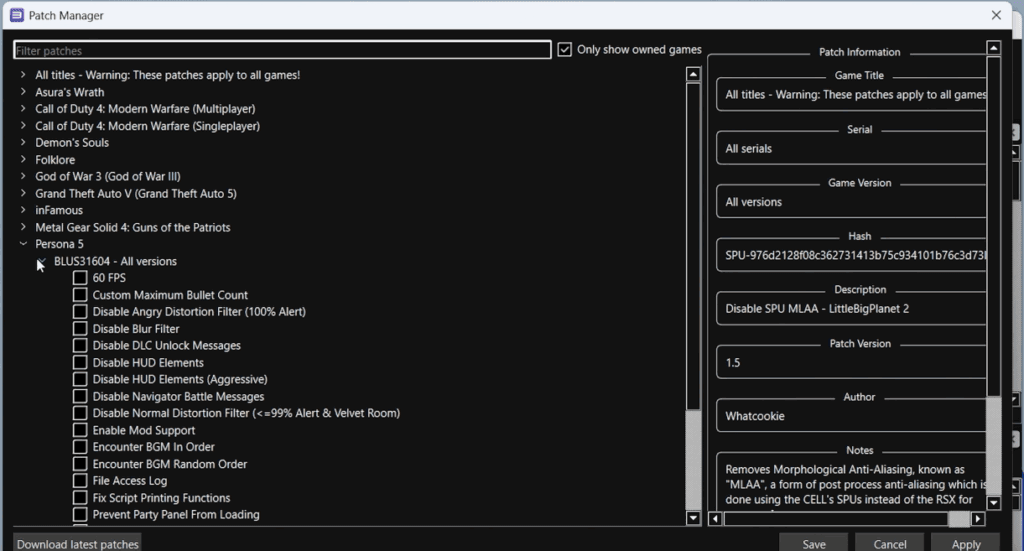
Next up, head to Manage at the top and then Game Patches.

Click Yes to let it download the patches.
Then just choose Only show owned games at the top.
Basically, game patches can be a lot of things – 60FPS patches in some cases, cheat type patches, disabling certain graphic settings, adding support for new aspect ratio’s and so on.

No need to do anything here just yet, click Save.
Per-Game Patches
Now, find a game in your list and right click, then Manage Game Patches.

It’ll open the same window except it will only show the options for that specific game now and you can feel free to enable or disable anything you want, but pay attention to the Notes in the bottom right as to what they do.
Click Save when done.
Installing Game Updates
Now you probably noticed that for a bunch of games, it says Update available and a newer version.
So let’s update our games to their newest versions.
We want the rusty-psn tool from Github – Grab whichever is the latest update and you want the rusty-psn-egui-windows.zip file, click it to download.

Go ahead and extract it and then open the rusty-psn app.
Run anyway if it asks.
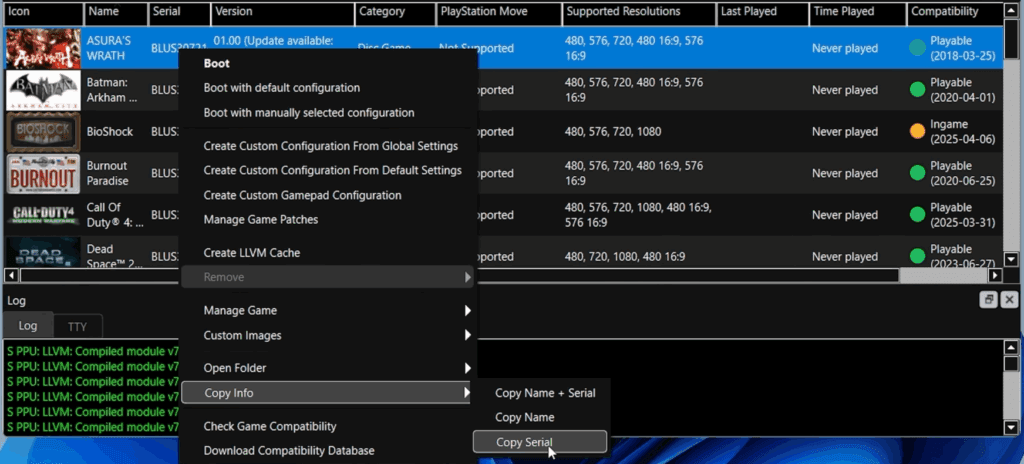
Head back to RPCS3 and find a game that needs an update and right click > Copy Info > Copy Serial.

Go back to Rusty and paste that serial in and click Search for updates.
Click Download All when you get the result.

If you check the rusty-psn folder, you’ll see a pkgs folder and the updates are in there.
To install those updates, open RPCS3 > File tab > Install Packages.

Navigate to that pkgs folder, the game name, and select all files inside and click Open.
Click yes to install the updates.
You should see the version after and it should no longer say updates available.
Per-Game Settings
Alright, let’s talk about per-game settings.
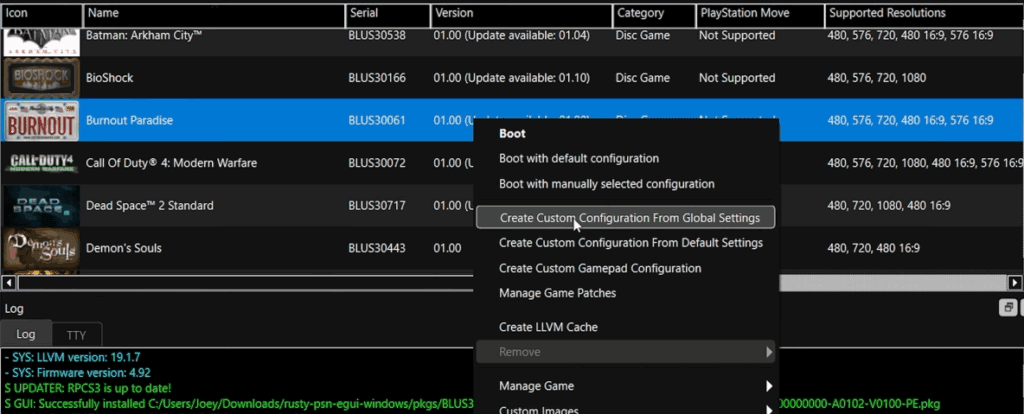
Right click a game, and you’ll see Create Custom Configuration from Global Settings and we want that.

Now any changes you make here will only apply to this specific game, so maybe you enabled the 60FPS patch and need to change the Framelimit to 60FPS or maybe you found some other settings that make the game run better.
Just click Save custom configuration at the bottom when done.
Booting a Game
Go ahead and double click a game to boot it up and it’ll do all of the compiling and things it needs to, then you can play.
It’s important to note – it will compile shaders for new spots you go to in the game, and will likely be compiling shaders throughout the entire time which can look like stutters.
If you ever reload the game or head back after the shaders are compiled, the game will run better at that point.
To exit, push Escape and X out.