What is Playnite?
Playnite combines all your clients into one nice frontend, and that includes emulation as well.
You can have Steam, Xbox, Epic, GOG or whatever you want, plus GameCube games, Game Boy games, PlayStation 2 and so on.
It’s the best all in one frontend available to launch your games from.
Just click the game and launch it, play a bit and when you’re done, you’ll be right back into Playnite, super easy.
You can also shutdown from the menu, restart and so on, with lots of options.
There’s also an absolute ton of plugins for Playnite for you to customize as needed – I’ll be showing you a few today like integrating HowLongToBeat stats, or Achievement information, but there’s a ton more if you want them along with different themes if you happen to not like Aniki Remake that we’re using today.
But you’ll love it, it’s an awesome frontend.
Downloading Playnite
Let’s start off with downloading Playnite, which you can grab right from their website.
Open the exe and you have an option here of making it Portable, which is actually what I do – you may want to move this to another PC easily one day, or another handheld and it’d be as easy as just copying the portable folder.
So let’s do that.
All you need to do is select the drive or folder you want to install to and it’ll create the Playnite folder for you, so I have mine right on the C drive, check Portable and click Install.
It’ll take some time to download and install.
Integrating Libraries
Now we can go through setup, and it’s going to ask you what libraries to integrate – basically, where are your games located so feel free to check any and all stores that you have games on and want to use Playnite to launch.
You’ll now need to go through one by one for each store you checked to log in and connect your account so Playnite can import those games.
I don’t usually check Import not installed games as I really don’t want to see games that I don’t have installed, but you can do so if you’d like – personal preference.
This will take a bunch of time, signing in, 2FA and all that fun stuff, but you’ll finally get to configuration finished then push Finish.
Tour of Playnite
You’re going to see all your games start to populate now on the left hand side and if you click the Grid icon, you can see them in a grid, which is a bit nicer as you see all the covers start downloading too.
While that’s all downloading, which you can see the progress at the top, let’s take a tour.
At the top, is a search bar and a search window.
Next to that is Filter presets, which we’ll talk about a lot more in a bit.
You can also filter by groups if the data exists.
Then we get to Details view, Grid view or List view.
There’s an Explorer panel for easier filtering on the left, or the Filter panel on the right, which we’ll talk about later.
Playnite Desktop vs. Fullscreen
Now, this view that we’re in right now is called Playnite Desktop, but the view I showed earlier in the video is called Playnite Fullscreen.
Click the controller icon top left and Switch to Fullscreen Mode.
This, is the default fullscreen Playnite experience with their default theme.
It’s actually pretty good – there’s a lot you can see already, covers, details, search, filter and so on and easily navigable with a controller.
We can launch directly into Fullscreen mode, which I’ll show you later how – for now, we have a lot to do on the desktop side of things.
Select or start on your controller should open the Playnite window and let’s just head back to Desktop mode for now.
Or use your mouse and click the Playnite icon top right and select Switch to Desktop mode.
Adding games manually
Let’s take a quick tour of the options.
Let’s say you have a game or games that are not on a store, click the controller icon top left, then Add Games and then Scan Automatically.
You can click Scan Folder and select the game folder.
Just put a checkmark next to the exe that it finds, and then click Add Game to add it.
Changing the library integrations
If you head to Library, Integrations, you can see the screens we did during setup, in case you want to change anything.
Adding Emulators
Controller icon top left > Library > Configure Emulators is where we go to setup adding emulated games.
So let’s say that I have some emulators installed and I want to add those so Playnite knows where they are – I actually have all my emulators nicely in an emulator folder so it’s an easy one click import, but otherwise you can just import each folder separately wherever you have each of them.
It’ll take some time to scan and then you’ll see it discovered my emulators so I can just click Import.
You should now see them on the left side.
Click save at the bottom.
Missing emulators
You may run into a scenario where some emulators weren’t recognized – Switch ones for example, newer emulators, 3DS ones and so on.
Head to Controller icon top left from the home screen > Add-ons > Browse > Generic and search for Extra Emulator Profiles. Install it.
Try the import again and it should discover them – that plugin adds more options for discovering emulators.
Adding Emulated Games
As of right now, all we did was tell Playnite where our emulators are, and now we have to tell Playnite where our emulated games are.
Head back to Controller icon top left > Add games > Emulated Game.
Now click Add scanner.
I’m going to do Wii U, which is CEMU, so scan with CEMU and default profile and then this will import them as Wii U games, but if you want to be double sure you can override platform and select Nintendo Wii U.
Now, scan folder is where your Wii U games are located to go ahead and select that.
Lastly, we want to save this as an auto-scan configuration because as we add more Wii U games, we want them to automatically be found and added to Playnite, so just check that box and call it Wii U.
Click Start scan and this will take some time as it scans.
When it’s done scanning, you’ll see a list of your games and you can check them if you’d like.
I don’t care much about Region being correct, so I’m just going to click Import.
If you change Library to Platform on the left, you can now see your Wii U games.
Grid shows it a lot easier.
Just repeat those same steps for any other emulators you have to get all your emulated games in here.
Installing the Aniki Remake Fullscreen Theme
At this point, we can go ahead and install Aniki Remake and configure it.
The Aniki Remake Github has a written guide with a lot more information if you ever need a reference or to find settings.
I highly recommend it.
Head to Controller icon top left > Addons, and then under Browse, go to Themes Fullscreen.
These are all of the themes available to you for Fullscreen Mode, but we want Aniki Remake for today.
Click it then click Install.
Click save and yes to restart.
Addons for Aniki Remake
Aniki Remake needs a few addons to work properly so head back to Addons.
This time go to Browse > Generic.
And you want to install the following: Theme Options, Extra Metadata Loader, Extra Metadata Loader Fullscreen Helper, HowLongToBeat, SuccessStory, and Playnite Sounds Mod.
Then head to Metadata Sources and install IGN Metadata and Universal PSN Metadata.
You can install them all at once then Save to restart and apply.
Downloading Metadata
Let’s use that new metadata, go to Library > Download Metadata and uncheck only missing metadata.
Scroll down to Cover Image and Background Image, check PSN and then move it up the priority list so it’s first.
Then click Download metadata to start the search.
Changing Aspect Ratio
Head to Controller icon top left > Settings > Appearance > Grid View and change Target aspect ratio to Square.
Logos
Let’s get some logos setup so head to Controller icon top left > Addons > Generic > Extra Metadata Loader and then the Logo settings tab and set them to 600 for width and 320 for height.
Adjust the sliders to those same numbers to.
On the main screen, CTRL A on your keyboard to select all games, right click, then head to Extra Metadata, Logos, download logos from Steam and then yes and yes to popups.
Trailers – Extra Metadata Loader
Once that’s done, we want to add trailers now as well cause those are cool to have on the game pages.
Head to Controller icon top left > Addons > Generic > Extra Metadata loader again.
Go ahead and click Download ffmpeg package and then extract the zip that it comes with.
Just move this extracted folder right into your Playnite folder, that way it goes with it.
Click download yt-dlp and again, move the exe that comes with it to your Playnite folder.
Go ahead and click Browse next to ffmpeg path and browse to that ffmpeg folder > bin folder and select ffmpeg.
Click Browse next to ffprobe and select ffprobe in the same spot.
Then click browse on yt-dlp and select the yt-dlp exe file.
Check the box for Download videos of newly added games on library update, scroll down and uncheck the three boxes of display video preview when video is not playing.
Trailers – Playnite Sounds Mod
Next, click Playnite Sounds Mod on the left.
Change Play Sound State to Never, the beeps can get annoying.
Head to the Music tab, and change Play Music State to Fullscreen otherwise it’ll play music in desktop mode too and then uncheck Pause music during video trailer with sound.
While we’re here, scroll down and you can do the same ffmpeg and yt-dlp browsing that we did before to find them and select them.
For ffmpeg-normalize path, I’ll direct you to the Aniki Remake Github Wiki as it involves installing Python and so on – this is optional, it normalizes the volumes of the music, so if you want that, it’s easy enough to do and then browse and select the ffmpeg-normalize here.
Check automatically download music for newly added games.
Click Save.
Same as before, CTRL A on your keyboard to select all games, right click, then head to Extra Metadata, videos, videos, download videos from Steam and then yes to popups.
You may get some popups as it goes to confirm the game, just do so or click cancel if the game doesn’t exist on steam.
Then, for Music, CTRL A to select all games, right click, Playnite sounds, download and click All.
This will take a bunch of time to download.
Configuring Fullscreen Mode
At this point, we can finally go see what fullscreen mode looks like.
Head to Controller icon top left > Switch to Fullscreen Mode.
Head to the Controller icon top right > Settings > Visuals and change the theme to Aniki Remake and then back out to restart.
You’ll see a cool sign in screen, push to jump in.
Layout
Head over to Settings > Layout, and enable Horizontal Scrolling then change Columns to 10 and Item spacing to 30.
Visuals
Head over to Settings > Visuals and enable Show Background Image on Main Screen.
Theme Options
Head over to Settings > Theme Options.
There’s also a bunch of others settings here – maybe you don’t want the sign in page or you want to customize it or the video that plays on startup.
There’s an absolute ton more you can do, but the default as we have it now should be perfect for most people.
Back out and restart Playnite and head back into Fullscreen mode.
You can actually load right into Fullscreen mode by selecting that exe in the folder.
Filter Presets
Push down to see the bottom of the screen and you can see some Filters, but you might be wondering – how can you get it to say Steam, or any other store, or maybe Nintendo Wii U or anything else.
Let’s go do it. Head back to desktop mode.
Enable the Filter icon to show up on the right and you can see if we click the drop down, the filters here are the same ones we saw at the bottom of Fullscreen Mode.
So let’s do one for Steam.
Click Steam under Library to filter it to just those games, then click the Save icon, call it Steam and check the box to Show in fullscreen mode.
If we head back to Fullscreen Mode and check the bottom, we now have a Steam filter and when we select it, it only shows Steam games.
The name matters
Now, the name of the Filter matters – Steam was easy, it’s just called Steam.
But, if you head into your Playnite folder > Themes > Fullscreen > Aniki Remake > Icons > Filter folder, you can see all the pre-created icons that will show up on the bottom as long as your Filter matches the name.
So you can see for Nintendo Wii U, I have to name it to match exactly how it looks here in the folder and so on.
Keep this in mind if your filter looks weird in Fullscreen mode!
SuccessStory – Achievements
To show achievements in Fullscreen Mode, head to Desktop Mode > Controller icon top left > Addons >SuccessStory and enable Steam Achievements or any other achievements you want like RetroAchievements.
Click the question mark on the right to see how you can setup the connection to Steam or Retroachievements and so on.
To see them, when you’re in Fullscreen Mode, you’ll see a trophy icon next to play on the Details page, and you’ll see all your achievements for that game.
Update SuccessStory for existing games
When you install SuccessStory above, it won’t automatically add achievements for your existing games – only new ones.
So, CTRL+A to select all your games, right click, SuccessStory and choose Refresh Data.
It should now add all of your achievements data for existing games!
HowLongToBeat
For HowLongToBeat, head to Desktop Mode > Controller icon top left > Extensions > HowLongToBeat > Download plugin data and then you can just click Download to start it.
Once that’s done, you’ll see that data in Fullscreen Mode as well which is super cool and right at the bottom with everything you need to know.
Start in Fullscreen Mode
In Desktop Mode > Settings > General.
If this is a device like an ASUS ROG Ally X or any other PC handheld that is used for gaming, you can launch directly into Playnite when starting Windows, so you can enable Launch in Fullscreen Mode and Launch Playnite when you start your computer.
Auto Close Clients
In Desktop Mode > Settings > Auto Close Clients.
Why do we want our clients to stay open after we’ve closed a game and are done playing?
Have Playnite close them for you. Super useful.
Enable Automatically close third party client after game exits and then enable the clients you want to apply it to.
Add Playnite to Apollo
Special last tip for Apollo users.
You can add Playnite as an Application on the Applications screen, for command set it to the Fullscreen app exe, make sure to enable Always use Virtual Display and then save.
Now you can boot right into Playnite from Artemis/Moonlight and get a full consolized streaming experience.
Add WeMod to Playnite
First, make sure the game exists in Playnite as normal.
Then, in WeMod head to the game page and click Mod settings > Create desktop shortcut.

Right click on the desktop shortcut we just created and click Properties. Copy the URL.

In Playnite, find the game and right click > Edit. Then head to the Actions tab.
Click Add Action and call it WeMod, change Type to Link and then paste the URL into the Path section.
Now, when you click Play on that game, it will give you two options. Done!

Add Fling Trainers to Playnite
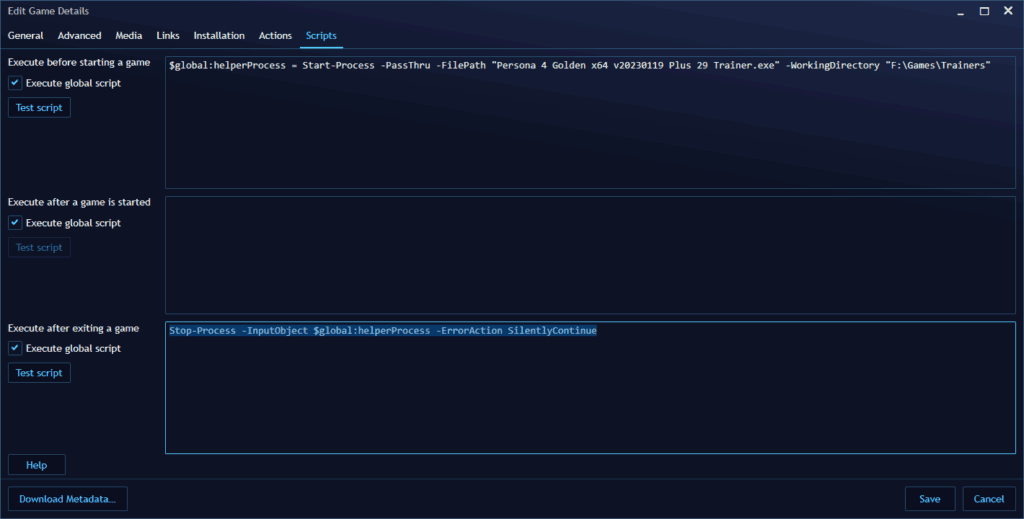
You may want to add Fling Trainers to Playnite, to open the trainer when starting the game and closing the trainer when exiting the game.
With your Fling Trainer downloaded and wherever you usually launch it from, open Playnite and find the corresponding game > Right click > Edit > Scripts tab.
In the Executive before starting a game field, you want to enter the following:
$global:helperProcess = Start-Process -PassThru -FilePath "FILENAME" -WorkingDirectory "FOLDER"You want to replace FILENAME with the filename including the extension of the Fling Trainer and replace FOLDER with the folder it’s in.
Here’s an example for Persona 4 Golden:
$global:helperProcess = Start-Process -PassThru -FilePath "Persona 4 Golden x64 v20230119 Plus 29 Trainer.exe" -WorkingDirectory "F:\Games\Trainers"Then, in the Executive after exiting a game field, you want to enter the following:
Stop-Process -InputObject $global:helperProcess -ErrorAction SilentlyContinueHere’s what it should look like if you did it correctly.

Click Save and you’re done!


